How to prepare your model in Revit.
Below are instructions on getting your Revit models ready for the BIM Holoview app.
If you need help with using the BIM Holoview application click here.
If you need help with exporting from Navisworks click here.
For tips to make sure the Automatic Coloring works as expected please click here.
For tips to get the best results for printing QR codes please click here.
BIM Holoview Revit plugin
If you dont want to use the plugin to upload your files then click here.
Download the Revit plugin here

Install the plugin using the install wizard. Follow the steps until installation is complete.
Placing the reference points
To import these into Revit follow these steps:


Using the Load families button
- Click on the button in the toolbar called Load families
- To load all family sets (A&B, C&D, E&F), click the Load all button
- Otherwise select the desired reference point set from the dropdown and click Load selected
You can choose any pair of reference points to use just make sure you have both reference points from that pair in your model.
If you have a larger model you may use all 3 pairs of reference points to be able to re-align the model when you are far away from your original placement reference points.
An example would be to start at the eastern side of the building and place reference points A&B there.
Then you would walk to the western most side of the building and if the model alignment is out then you can place the C&D reference points to re-align it.
So the A&B reference points are in the eastern side of the Revit model and the C&D reference points are in the western side of the Revit model.
To place these objects into the model follow these steps:
Note: For optimal results when placing the reference points we recommend following these guidelines.
- Place the reference points on a flat surface preferably a wall.
- The location of the reference points should have good lighting to make it easier for the Hololens to mark the points.
- The reference points should be at least 1 meter apart.
- They should be easily accessible as you will need to place those marker points through the Hololens.
- They should be at least half a meter away from the corners of walls. The Hololens isn't as accurate in corners.
To place the reference points follow these steps:

- Navigate the model to the wall/place you want to place them.
- Under the Architecture tab click on Component.
- In the Properties click the dropdown where you can select your components.
- Scroll through or search for one of the reference points and click on it.
- Place the RedCraterReferencePoint on the surface you wish to have it.

- Scroll or search for the other reference point and do the same. The names of the reference points are RedCraterReferencePointA and RedCraterReferencePointB, RedCraterReferencePointC and RedCraterReferencePointD and RedCraterReferencePointE and RedCraterReferencePointF.
The BIM Holoview app only works with FBX models that have at least one pair of RedCraterReferencePoints.
Using the plugin

|
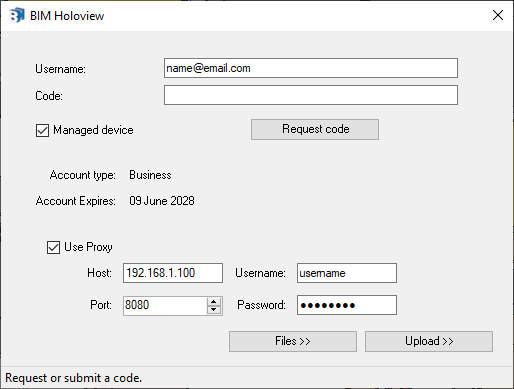
Username/password logon:
Log on using the credentials you use to sign in at bimholoview.com
If you are required to go through a proxy then click the Use Proxy checkbox to input your proxy details such as:
- Host
- Port
- Username
- Password
Files takes you to a list of your currently uploaded files.
Upload takes you straight to the upload section.
|

|
If you're account has Single-Sign-On enabled, you can sign in using the managed device checkbox option:
- Tick the Managed device checkbox
- Enter the email you use to sign in at bimholoview.com
- Click the Request Code button and wait for a pop-up letting you know to check your email.
- This will send a request to the server, verify your Single-Sign-On details and send a 1-time use 6-digit code via email. Enter that code into the Code field.
- Then click one of the buttons below to confirm the code:
- Files takes you to a list of your currently uploaded files.
- Upload takes you straight to the upload section.
|

|
|
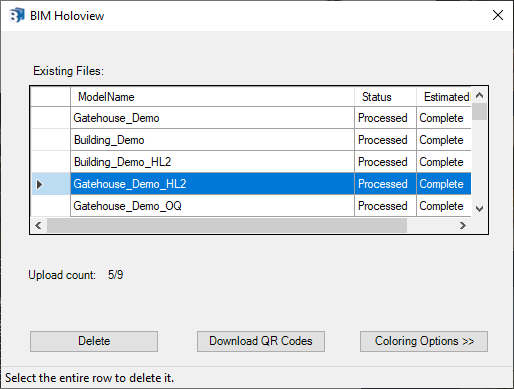
The files form shows your existing uploaded files.
- Select a row and click Delete to delete the model from the BIM Holoview server.
- Select a row that is a HoloLens 2 model and the Download QR Codes button will become enabled. Click this to download the QR codes for that model.
- Click Coloring Options to go to the coloring options prior to the uploads section.
|

|
|
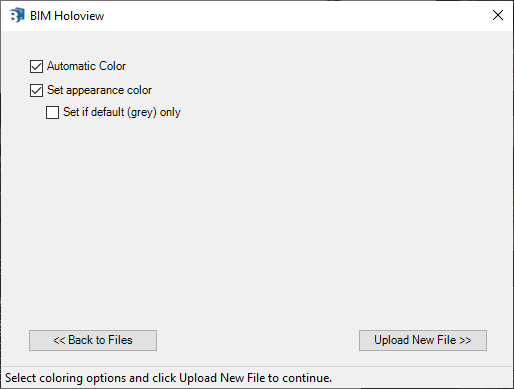
Use the coloring form to modify any coloring options.
- Automatic Color will put your model through our automatic coloring process.
-
Set appearance color will modify the appearance color based on the graphics color. Sometimes there can be a descrepancy between them and the appearance color is what is seen once the FBX is exported. These colors can be found in Revit > Manage > Materials > Graphics/Appearance tabs.
- If Set if default (grey) only is checked then it will only modify the appearance color if the appearance color is grey, which is the default color.
|

|
|
To upload your file, select your desired 3D view from the 3D view list, input your desired file name, select the desired settings and click Process File.
- Export Property Data will upload property data gathered from Revit and process it with your model to be viewable in the BIM Holoview application.
- Remote Rendering will put the model through a different process and will allow it to be rendered remotely. Use this for extra large models that won't be able to be viewed on the HoloLens normally.
- The Project dropdown will list all of your projects. Select the project you want your model to go into.
- Select Device version:
- HoloLens 1
- HoloLens 2
- Meta Quest
If HoloLens 2 or Meta Quest is selected and your account is ARR enabled then you can select the Remote Rendering option.
Once uploading has started please wait until the buttons become active again and you see the message "Uploaded to server, awaiting processing..." to continue using the plugin. Once the file is uploaded, if it is a HoloLens 2 model then you will have the option to download the QR codes for the model at the end too.
|

|
Watch this video for a demonstration of using the Revit plugin